Multi-Step Conversations & Generative UI
Your chatbot can already call tools, but we can make it more powerful. Right now, when you ask for weather in multiple cities, the model makes separate calls - let's enable it to handle multiple steps intelligently. And those tool results? We can render them as custom React components instead of debugging displays.
In this lesson, you'll enable multi-step conversations where the AI can chain multiple tool calls together, and generative UI where tool results render as custom React components instead of the Elements Tool components.
What We're Building
Try asking your current chatbot: "What's the weather in San Francisco and New York?"
You'll get weather data, but the flow feels incomplete. We can make this much more intelligent by allowing the AI to:
- Make multiple tool calls
- Synthesize a natural language response
- Display results in custom UI components instead of debug tool cards
Good news: Your template already includes a polished Weather component ready to use! We'll integrate it to replace the tool debugging display.
Step 1: Enable Multi-Step Conversations
Right now, if you ask "What's the weather in San Francisco and New York?", the AI makes tool calls but doesn't provide a natural language summary afterward. Let's fix that!
Why Multi-Step is Required
Without multi-step, the AI must choose ONE action per request:
- Either call tools (one or multiple)
- Or generate a text response
- Not both!
This limitation means:
- ❌ Can't call weather tool AND explain the results
- ❌ Can't make sequential tool calls based on previous results
- ❌ Can't provide a synthesis after gathering data
Multi-step conversations solve this by allowing the AI to take multiple "steps" where each step can:
- Call one or more tools in parallel
- Process tool results
- Decide to call more tools OR generate a response
- Finally synthesize everything into natural language
Learn more about multi-step interfaces and isStepCount in the documentation.
The key is adding stopWhen configuration to your API route:
import { streamText, convertToModelMessages, isStepCount } from 'ai';
import { getWeather } from './tools';

// In your POST function:
const result = streamText({
  model: "openai/gpt-5-mini", // Fast model for multi-step workflows with tool chaining
  instructions: `You are a helpful assistant. When using tools, only mention
    capabilities you actually have. The weather tool provides current
    temperature, conditions, and humidity only - no forecasts.`,
  messages: await convertToModelMessages(messages),
  tools: { getWeather },
  stopWhen: isStepCount(5), // ADD THIS: Enables up to 5 steps
});Testing Multi-Step Behavior
-
Save your changes to
app/api/chat/route.ts -
Restart your dev server if needed:
pnpm dev -
Navigate to
http://localhost:3000/chat -
Test these queries to see multi-step in action:
Single city (baseline): "What's the weather in Tokyo?"
- Expected: One tool call, then a response
Multiple cities: "What's the weather in San Francisco and New York?"
- Expected: Two tool calls, then a synthesis comparing both
Complex query: "Compare the weather in London, Paris, and Berlin"
- Expected: Three tool calls, then a comprehensive comparison
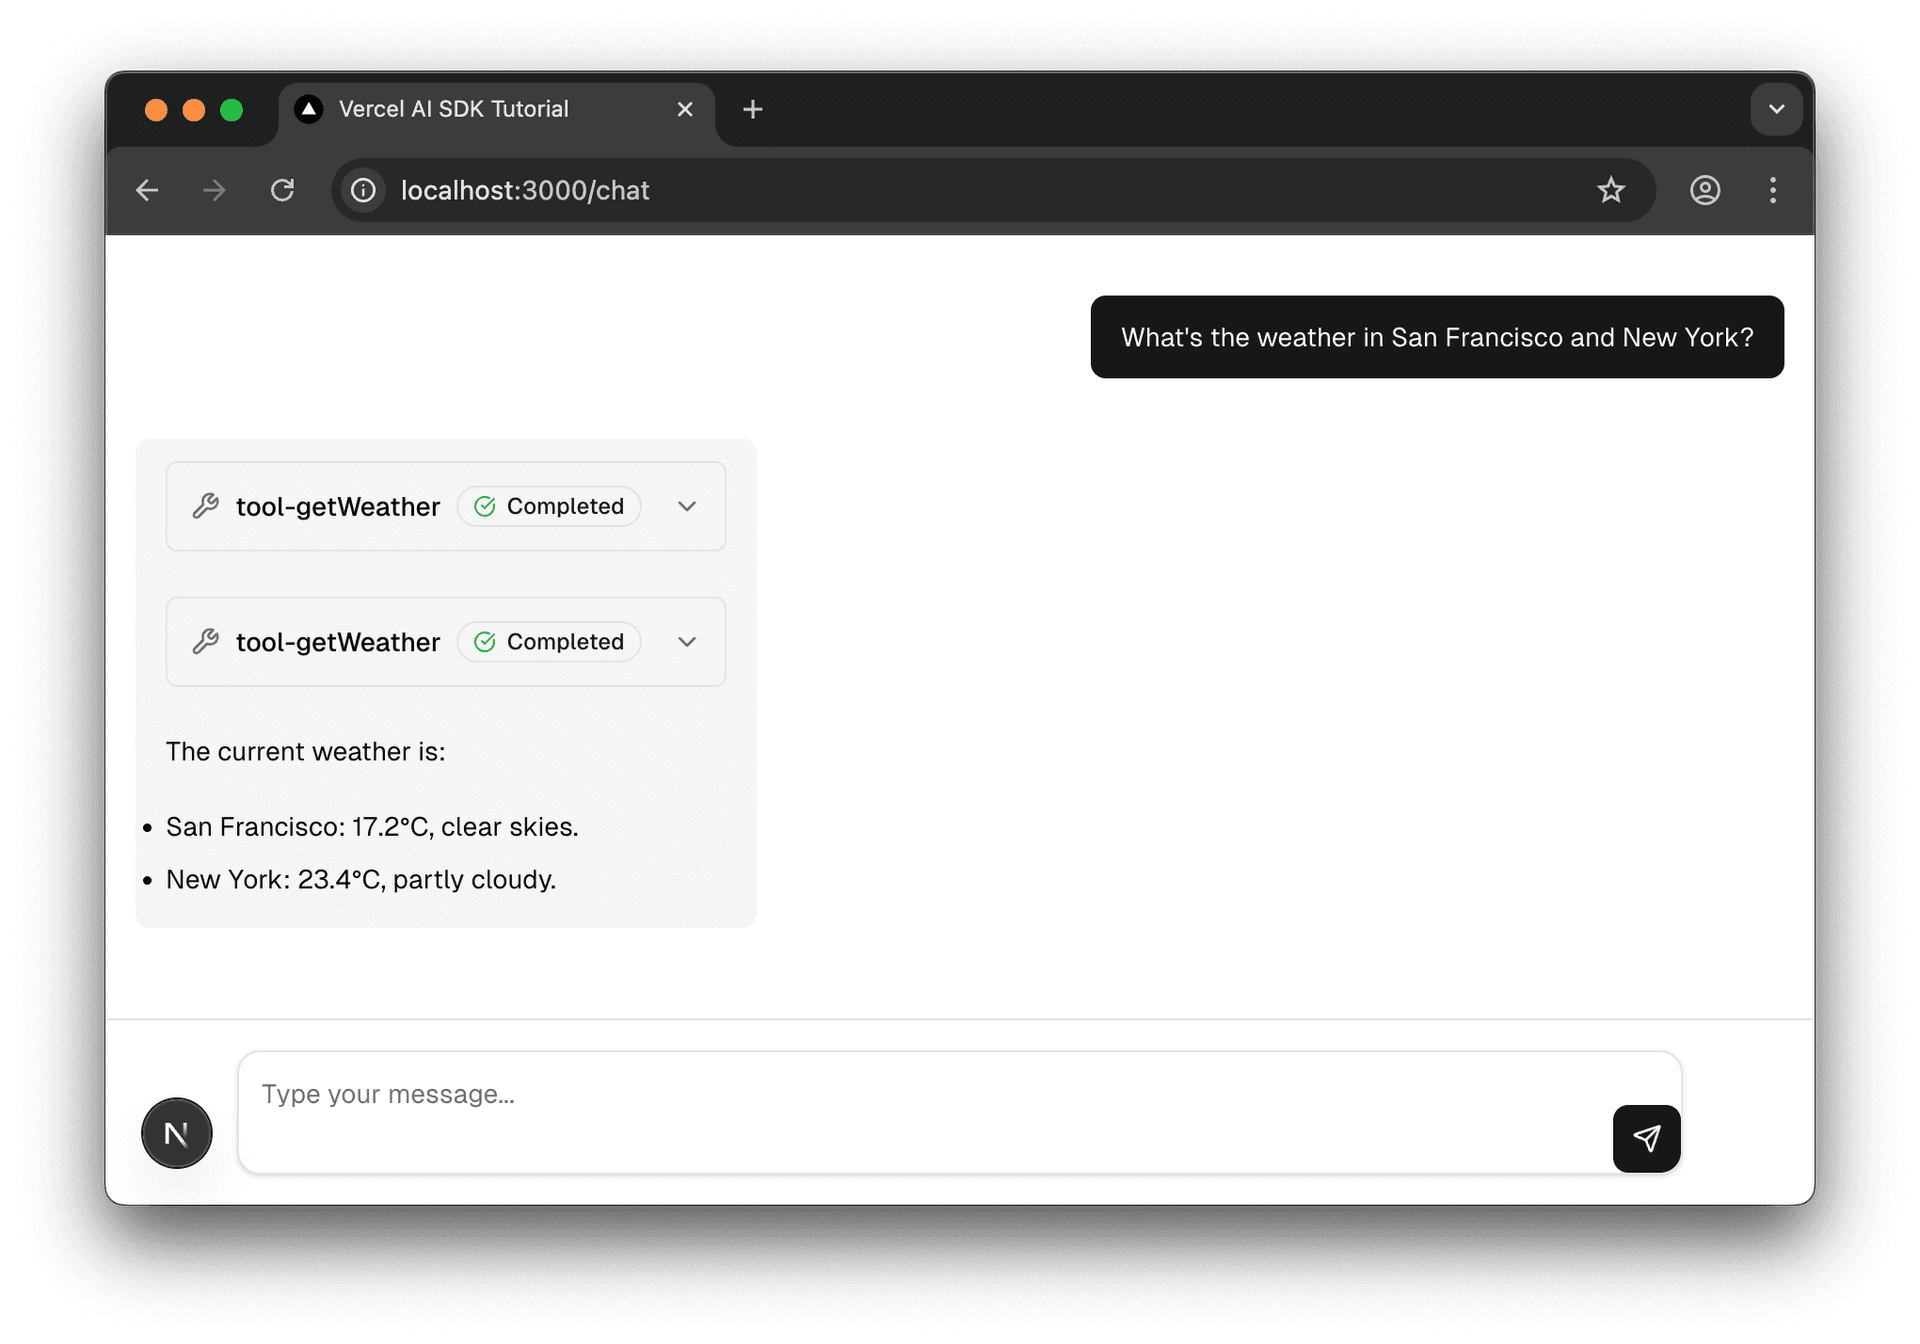
You should now see:
- Tool calls for each city (shown as Tool components)
- A natural language summary that synthesizes all the data
When the AI makes a tool call, the result automatically feeds back into the conversation context. The model then decides whether to:
- Make another tool call
- Provide a text response
- Both
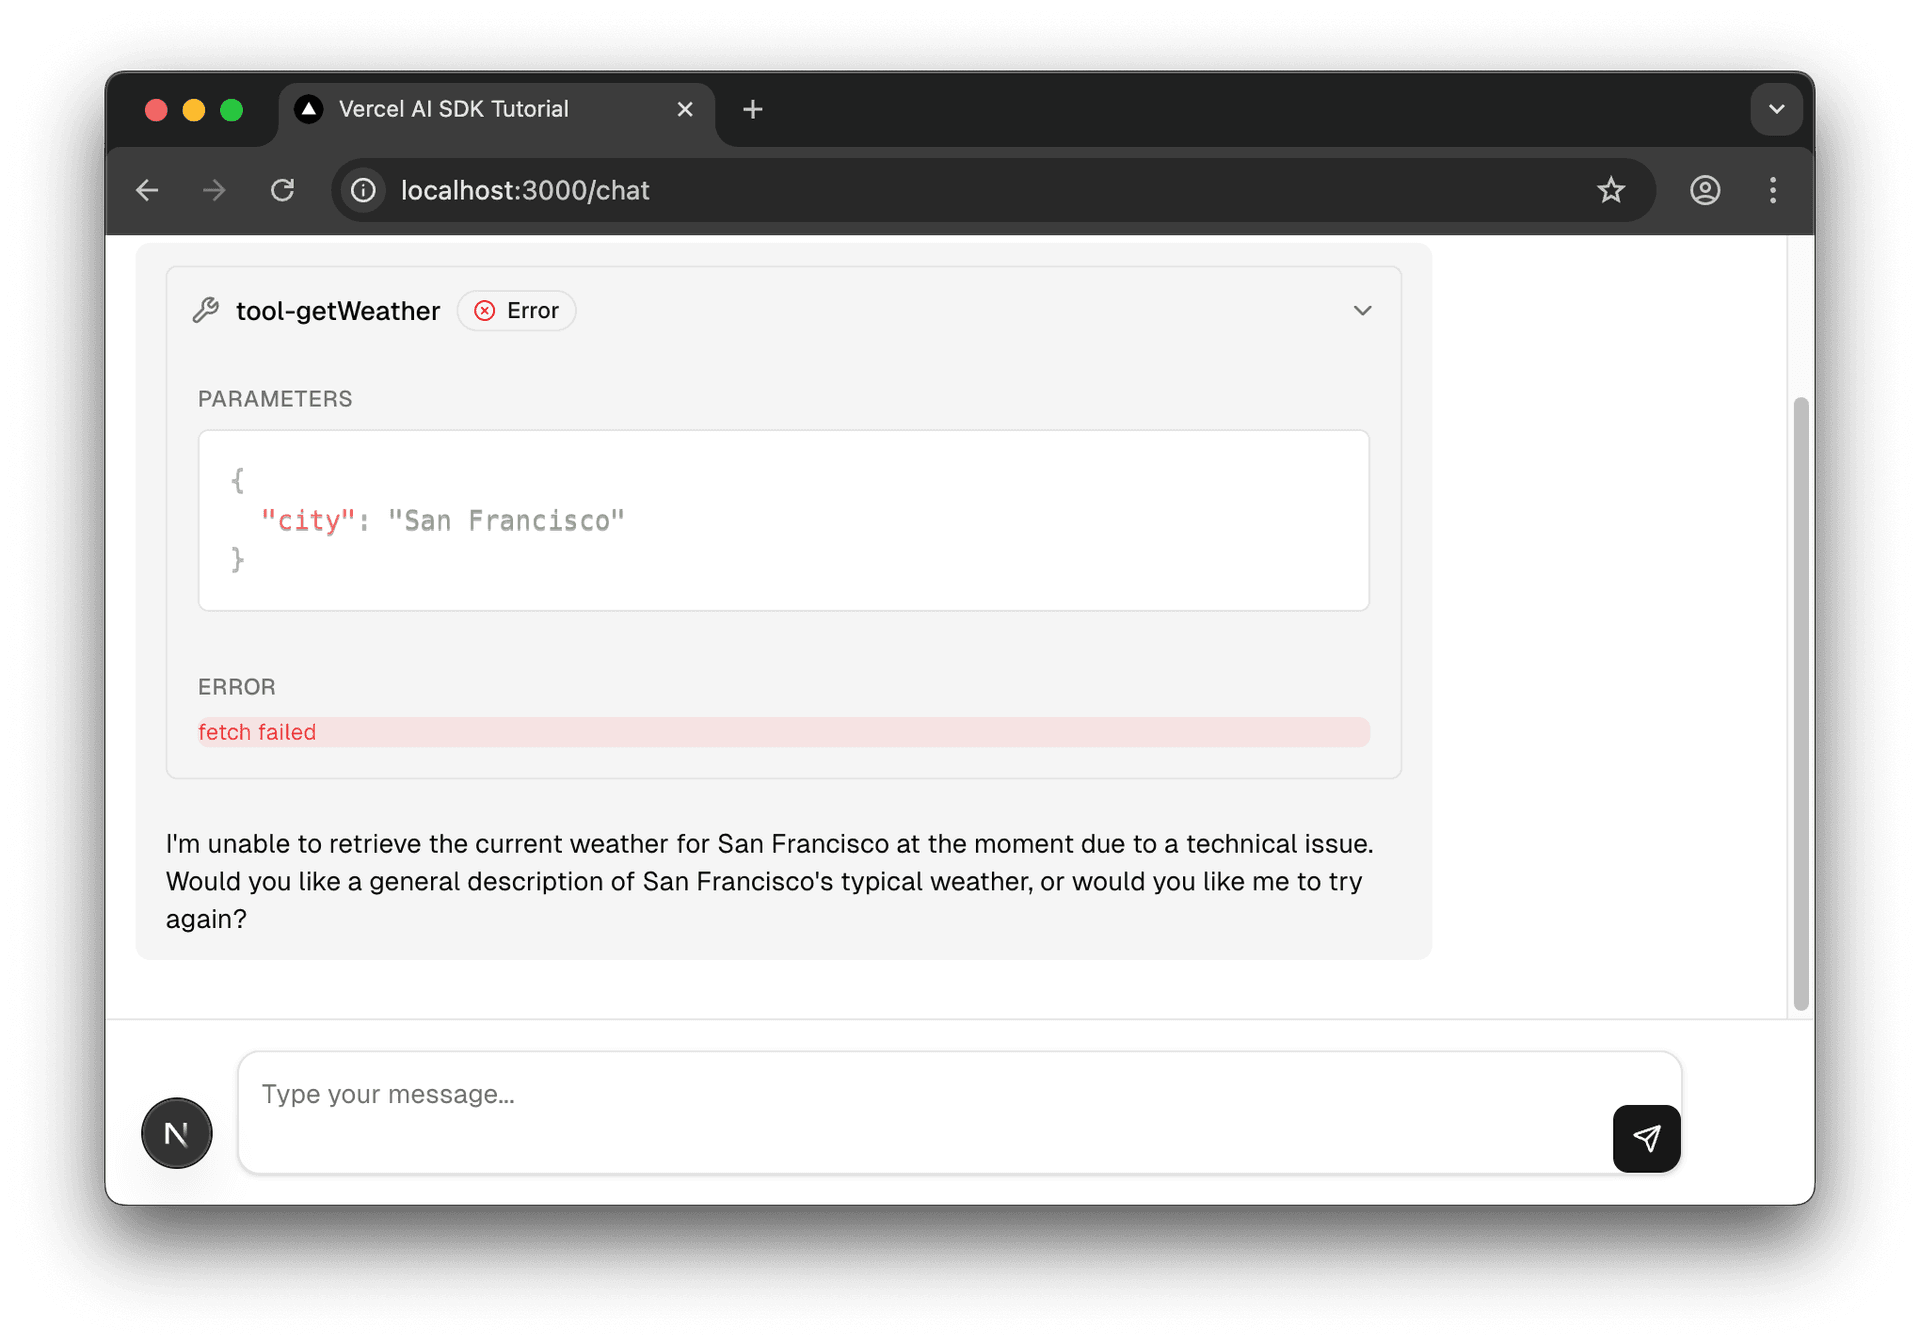
This even works when tools fail! If a tool returns an error, the AI can acknowledge the failure and offer alternatives or retry suggestions.
Step 2: Build Generative UI with Weather Components
Right now, tool results display using the Elements Tool component - which works great for debugging but isn't very user-friendly. Generative UI means rendering custom React components based on tool data. Instead of showing tool execution details, let's create visual weather cards that users actually want to see.
Understanding the Weather Component
Your template includes app/(5-chatbot)/chat/weather.tsx - a pre-built Weather component. Let's understand what it provides:
import {
  Cloud,
  Sun,
  CloudRain,
  CloudSnow,
  CloudFog,
  CloudLightning,
} from "lucide-react";

export interface WeatherData {
  city: string;
  temperature: number;
  weatherCode: number;
  humidity: number;
}

function getWeatherIcon(weatherCode: number) {
  if (weatherCode === 0) return <Sun size={48} />;
  if (weatherCode === 1 || weatherCode === 2) return <Cloud size={48} />;
  if (weatherCode === 3) return <CloudFog size={48} />;
  if (weatherCode >= 51 && weatherCode <= 67) return <CloudRain size={48} />;
  if (weatherCode >= 71 && weatherCode <= 77) return <CloudSnow size={48} />;
  if (weatherCode >= 80 && weatherCode <= 99) return <CloudLightning size={48} />;
  return <Sun size={48} />;
}

function getWeatherCondition(weatherCode: number): string {
  if (weatherCode === 0) return 'Clear sky';
  if (weatherCode === 1) return 'Mainly clear';
  if (weatherCode === 2) return 'Partly cloudy';
  if (weatherCode === 3) return 'Overcast';
  // Add more conditions as needed
  return 'Unknown';
}

export default function Weather({ weatherData }: { weatherData: WeatherData }) {
  return (
    <div className="text-white p-6 rounded-2xl backdrop-blur-lg bg-gradient-to-br from-blue-400 via-blue-500 to-blue-600 shadow-lg max-w-sm">
      <h2 className="text-2xl font-semibold mb-4">{weatherData.city}</h2>
      <div className="flex items-center justify-between">
        <div>
          <p className="text-4xl font-light mb-1">{weatherData.temperature}°C</p>
          <p className="text-lg opacity-90">
            {getWeatherCondition(weatherData.weatherCode)}
          </p>
        </div>
        <div className="ml-6" aria-hidden="true">
          {getWeatherIcon(weatherData.weatherCode)}
        </div>
      </div>
      <div className="mt-4 flex items-center">
        <CloudFog size={16} aria-hidden="true" />
        <span className="ml-2 text-sm">Humidity: {weatherData.humidity}%</span>
      </div>
    </div>
  );
}
This component:
- Exports
WeatherDatainterface with city, temperature, weatherCode, and humidity that is used in the component props - Maps weather codes to appropriate icons (sun, clouds, rain, snow, etc.)
- Renders a gradient card with the weather information
- Has a fallback to default San Francisco weather if no data is provided
Update Your Chat Page
Now let's integrate the Weather component. We need to:
- Import the Weather component
- Conditionally render it for successful tool results
- Keep the Tool component as fallback for loading/error states
TODO: Before looking at the solution below, try to:
- Add
import Weather from "./weather";after your other imports (around line 24) - Find the
case "tool-getWeather":section in your switch statement - Add a conditional check: if
part.state === "output-available" && part.output- Render
<Weather weatherData={part.output} /> - Otherwise, keep the existing Tool component
- Render
- Make sure to keep the same key prop pattern
Solution:
"use client";

import { useState } from "react";
import { useChat } from "@ai-sdk/react";
import {
  Conversation,
  ConversationContent,
  ConversationEmptyState,
} from "@/components/ai-elements/conversation";
import { Message, MessageContent } from "@/components/ai-elements/message";
import { Response } from "@/components/ai-elements/response";
import {
  Tool,
  ToolContent,
  ToolHeader,
  ToolInput,
  ToolOutput,
} from "@/components/ai-elements/tool";
import {
  PromptInput,
  PromptInputTextarea,
  PromptInputSubmit,
} from "@/components/ai-elements/prompt-input";
import Weather from "./weather";

export default function ChatPage() {
  const [input, setInput] = useState("");
  const { messages, sendMessage, status } = useChat();

  const isLoading = status === "streaming" || status === "submitted";

  return (
    <div className="flex flex-col h-screen">
      <Conversation>
        <ConversationContent>
          {messages.length === 0 ? (
            <ConversationEmptyState
              title="Start a conversation"
              description="Type a message below to begin"
            />
          ) : (
            messages.map((message) => (
              <Message key={message.id} from={message.role}>
                <MessageContent>
                  {message.role === "assistant"
                    ? message.parts?.map((part, i) => {
                        switch (part.type) {
                          case "text":
                            return (
                              <Response key={`${message.id}-${i}`}>
                                {part.text}
                              </Response>
                            );
                          case "tool-getWeather":
                            // Show Weather component for completed tool calls
                            if (part.state === "output-available" && part.output) {
                              return (
                                <Weather
                                  key={part.toolCallId || `${message.id}-${i}`}
                                  weatherData={part.output}
                                />
                              );
                            }
                            // Show tool UI for other states (loading, error)
                            return (
                              <Tool key={part.toolCallId || `${message.id}-${i}`}>
                                <ToolHeader type={part.type} state={part.state} />
                                <ToolContent>
                                  <ToolInput input={part.input} />
                                  <ToolOutput
                                    output={JSON.stringify(part.output, null, 2)}
                                    errorText={part.errorText}
                                  />
                                </ToolContent>
                              </Tool>
                            );
                          default:
                            return null;
                        }
                      })
                    : message.parts?.map(
                        (part) => part.type === "text" && part.text
                      )}
                </MessageContent>
              </Message>
            ))
          )}
        </ConversationContent>
      </Conversation>

      <div className="border-t p-4">
        <PromptInput
          onSubmit={(message, event) => {
            event.preventDefault();
            if (message.text) {
              sendMessage({ text: message.text });
              setInput("");
            }
          }}
          className="max-w-3xl mx-auto flex gap-2 items-end"
        >
          <PromptInputTextarea
            value={input}
            onChange={(e) => setInput(e.target.value)}
            placeholder="Type your message..."
            disabled={isLoading}
            rows={1}
            className="flex-1"
          />
          <PromptInputSubmit disabled={isLoading} />
        </PromptInput>
      </div>
    </div>
  );
}
Implementation Guide
The key changes you made:
- Line 24: Import the
Weathercomponent from./weather - Lines 56-63: Modified the
tool-getWeathercase to:- Check if
part.state === "output-available"(tool completed successfully) - If yes → Render the custom
Weathercomponent with the data - If no → Keep showing the
Toolcomponent for loading/error states
- Check if
This conditional rendering pattern lets you show polished UI for success while maintaining debugging visibility for errors.
Test Your Implementation
Try it: Ask "What's the weather in Tokyo?" and you should see a styled weather card instead of the tool display!
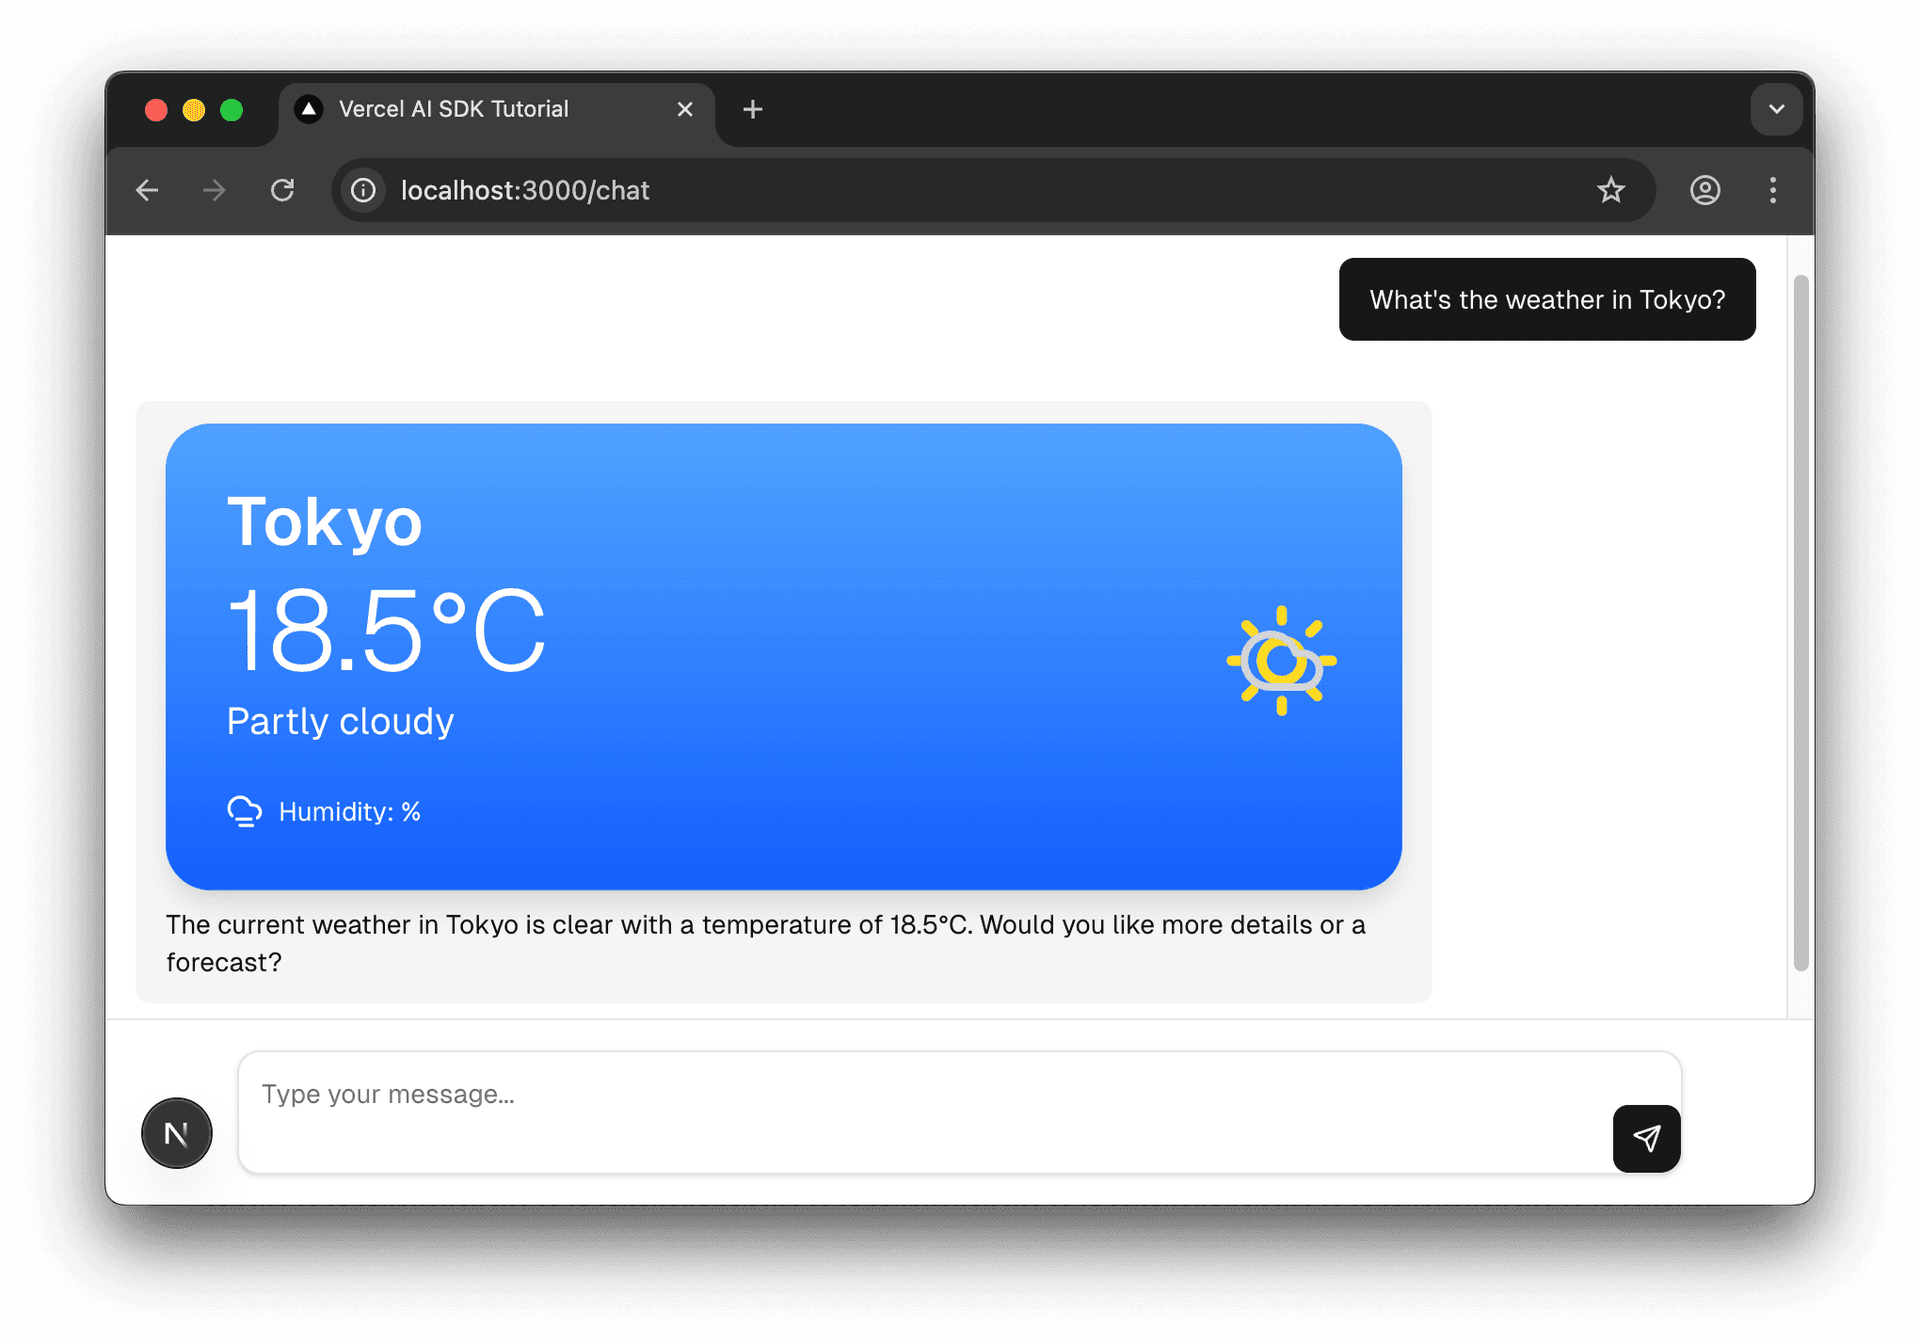
Perfect! Now you have polished weather cards that display instead of tool debugging info.
Key Takeaways
You've built a sophisticated chatbot with multi-step tool use and custom UI components:
- Multi-Step Conversations: Use
stopWhen: isStepCount(5)server-side to enable the AI to make multiple tool calls and synthesize results. - Generative UI: Render custom React components based on tool results (
part.state === 'output-available') instead of generic tool displays. - Message Parts: The AI SDK uses a
message.partsarray structure with typed tool parts liketool-getWeather. - Conditional Rendering: Show custom components for successful results, fallback to tool UI for loading/error states.
Finally: Course Wrap-up & Your AI Future
You've built a sophisticated chatbot with multi-step tool use and generative UI! It's time to wrap up.
This final lesson provides resources, next steps, and guidance for continuing your AI development journey with the AI SDK and beyond.
Was this helpful?